The solar power generation system consists of a solar cell, solar charge controller, and storage battery (pack). If you want the solar power system to output 220V or 110V AC power, you need to configure a solar inverter. The solar charge controller regulates the charging and discharging of the battery and controls the solar cell and the battery's power output to the load according to the power demand of the load, which is the core part of the whole photovoltaic power system.
Function of MPPT solar charge controller
The MPPT charge controller can detect the voltage and current of solar panels in real-time and continuously track maximum power, thus the system is always charging the battery at the maximum power. The MPPT tracking efficiency is up to 99%, and the power generation efficiency of the whole PV system reaches 97%.
MPPT solar charge controller connection
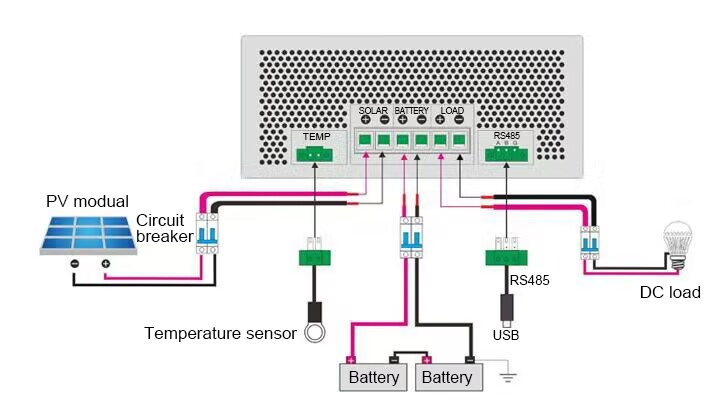
The figure below is a basic wiring diagram of the MPPT solar charge controller on inverter.com. Next, we will show you step by step how to properly connect the controller with the solar panel, battery and DC load.

Before connection
Before the wiring, you first remove the cover and loosen the connection lock, and then you will see the wiring terminals for the solar panel, battery, and load as well as a temperature sensor and Rs 485 port for the PC.
 Connect batteries to the MPPT charge controller
See the wiring diagram below for the connection between the charge controller and batteries. Make sure that the positive and negative terminals of the charge controller and batteries are properly connected. The batteries are connected in series. Please note that when connecting the batteries, it must disconnect the circuit breaker.

Connect the DC load to the MPPT charge controller
The “DC LOAD” terminal of the MPPT solar charge controller can be connected to a DC load of the same rated voltage as the batteries. The charge controller provides the power based on the battery voltage. The wiring diagram of the solar charge controller and DC load is shown as below.
 Connect the PV panel module to the MPPT charge controller
The MPPT solar charge controllers are suitable for 12V, 24V, and 48V off-grid solar panel modules, and are also applied for the grid tie module of which the open voltage does not exceed the specified maximum input voltage. The PV module in the solar system cannot be lower than the system voltage. Please note that when connecting the PV module, you must disconnect the circuit breaker. The connection is displayed in the below figure.
 Temperature sensor, MPPT charge controller, and PC connection
The MPPT solar charge controller can be connected to the temperature sensor and PC via Rs485. The Rs485 communication line is optional. You can buy extra if necessary.

By following these steps, you can safely and effectively connect an MPPT solar charge controller to your solar power system, ensuring optimal performance and longevity of your equipment.

Pls I want to know if I will connect that 400 vdc from pv to mppt positive and negative after battery bank was 48vdc to mppt
to program and install
locateRon@gmail.com
I am not wanting charity. I will pay for your help
I also had to book-mark this page for any "re-runs" or just to refreash my nooby knowledge!
Most of the other sites didn't even bother putting any pictures, and rather bothered us trying to read THRU facebook, twit-er, etc to see the font on their quasi-explainations.
SO thank you very much for QUALITY instructions and photos!