Solar charge controllers are essential components of any solar power system. They regulate the flow of electricity from solar panels to the battery, ensuring that the battery is charged efficiently and safely. Regularly testing your solar power charge controller can help identify potential issues and ensure your solar system operates at peak performance. This guide will outline how to test your solar charge controller.
Understanding the role of a solar charge controller
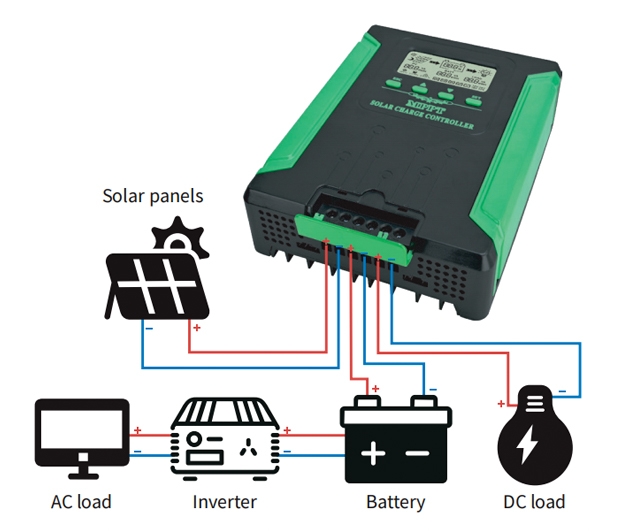
Before diving into testing, it's vital to understand what a solar power charge controller does. Its primary functions include:
- Regulating voltage and current. It ensures that the voltage and current from the solar panels are appropriate for the batteries.
- Preventing overcharging. Excessive charging can damage batteries, and the controller halts charging when the battery reaches full capacity.
- Ensuring safe discharge. It protects batteries from over-discharging, which can shorten their lifespan.
- Load control. Many controllers manage DC loads directly, ensuring power stability.
There are two main types of charge controllers: Pulse Width Modulation (PWM) and Maximum Power Point Tracking (MPPT). MPPT solar charge controllers are generally more efficient, especially in larger systems.
Tools you will need
To effectively test your solar power regulator, prepare the following tools:
Multimeter: To measure voltage and current; Clamp meter (optional): For non-intrusive current measurement; Solar panel specifications: Knowing your panel's rated voltage and current is crucial for comparison; Battery specifications: Helps ensure the controller matches your battery’s charging requirements; Loads (optional): Devices or resistors to test performance under load.
Step-by-step guide to test
1. Inspect the setup
- Visual inspection. Check all connections between the solar panels, charge controller, and batteries. Ensure cables are securely attached and free from corrosion or damage.
- Verify specifications. Confirm that your solar panels, batteries, and charge controller are compatible in terms of voltage and current ratings.
2. Test solar panel output
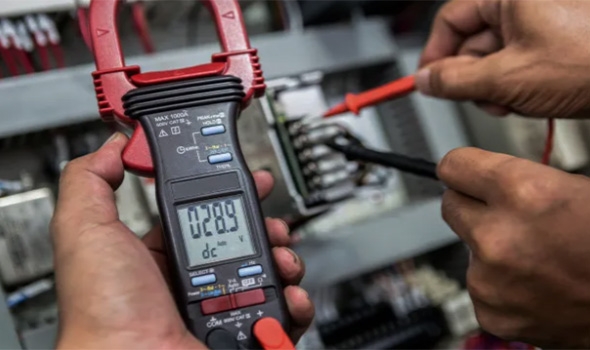
- Use a multimeter to measure the open-circuit voltage of your solar panels. Disconnect the panels from the controller and touch the multimeter probes to the panel terminals.
- Compare the measured Voc with the panel's rated value under similar sunlight conditions.
- Check the short-circuit current using the multimeter, ensuring your meter can handle the panel's maximum current safely.
3. Check input to the charge controller
- With the solar panels connected to the controller, measure the voltage at the controller's solar input terminals.
- Compare this value with the panel's output. A significant drop might indicate issues such as faulty wiring or shading on the panels.
4. Verify charging voltage
Measure the voltage at the battery terminals while the controller is charging the battery. Ensure it aligns with the expected charging stage:
- Bulk charge. Maximum current is delivered to the battery until it reaches a set voltage.
- Absorption charge. Voltage is maintained at a set point while current decreases.
- Float charge. Voltage is reduced to maintain the battery without overcharging.
5. Assess current flow
- Use a clamp meter to measure the current flowing from the solar panels to the controller and from the controller to the battery.
- Ensure the current matches expected values based on the solar irradiance and panel specifications.
6. Test controller efficiency (For MPPT Controllers)
- Measure the input power (voltage × current) from the solar panels and the output power delivered to the batteries.
- Calculate efficiency: Efficiency (%)=(Output Power/Input Power)×100. An efficient MPPT charge controller typically operates at 95% or higher efficiency.
7. Load testing
- Attach a load tester or resistor bank to simulate power usage from the battery.
- Monitor the controller's behavior, ensuring it maintains stable voltage and current to the load while protecting the battery from over-discharge.
8. Test safety features
- Overcharge protection. Observe if the controller stops charging once the battery reaches full charge.
- Overload protection. Introduce a load exceeding the controller's capacity and check if it shuts down or limits the current.
- Short circuit protection. Briefly create a short circuit and verify if the controller cuts off power to prevent damage.
Interpreting results and troubleshooting
If you encounter any irregularities during testing, consider these troubleshooting tips:
- Low voltage or current. Check for shading, dirty panels, or loose connections.
- Controller not charging. Verify that the battery voltage is within the acceptable range for the controller.
- Overheating. Ensure proper ventilation and that the controller is not operating beyond its rated capacity.
- Inconsistent readings. Test under stable sunlight conditions and confirm your tools are calibrated.
Conclusion
Testing the performance of your solar charge controller is an essential part of maintaining a reliable and efficient solar power system. By following the steps outlined above, you can identify potential issues early, ensure your components are working harmoniously, and extend the lifespan of your solar setup. Regular monitoring and maintenance will help you harness the maximum potential of your solar energy system, making it a sustainable and cost-effective solution for years to come. If you have any question about solar charge controller, Inverter.com will help you.